Content
A motor-cultivator is a versatile technique with which you can do a lot of housework. The unit is in demand even in winter for snow removal, only you need to connect the appropriate attachments to it. Now we will look at the process of making a snow blower from DIY motor cultivator, and also find out what nozzles are still used for work in winter.
Varieties of snow plows, the principle of their operation and the procedure for manufacturing
The variety of snow removal equipment for motor cultivators is not so great. The most effective is the rotary hitch. Snow can also be removed with a blade. A road brush is usually paired with this shovel, but at home, the latter type of hitch is rarely used.
Shovel blade for clearing snow
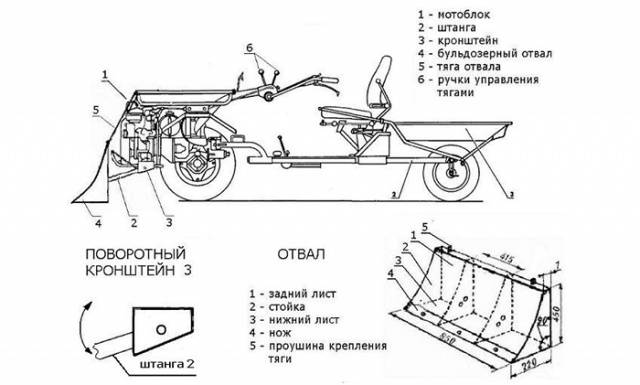
The simplest plow for a cultivator is a blade. Although, it is wiser to use a bulldozer with a walk-behind tractor, since it has a more powerful engine. But you can also weld a small shovel for a motor-cultivator. It is very simple to work with such a hinge. The blade is attached to a bracket on the cultivator frame. During the movement of the equipment, the shovel rakes the snow cover. So that the snow goes to the side, and does not rake in a large pile, the shovel is installed at a slight angle relative to the roadside.
For a motor-cultivator, the blade is made of steel sheet 3 mm thick. However, it is very difficult to bend a metal workpiece on your own without the appropriate equipment. It is easier to find a piece of steel pipe with a diameter of 200-300 mm, divide it lengthwise into three parts and cut out one semicircular segment with a grinder.
The bottom of the shovel is the knife. He will cut the snow layer. However, a steel knife can damage paving slabs or asphalt. For such work it is necessary to cut a strip from the conveyor belt and fasten it with bolts to the bottom of the blade.
On the back of the shovel, 2 eyes are welded at the top, and the rods are attached to them, going to the control levers. The eyes are also welded in the center of the blade. A bar is attached here, with the help of which the hitch is fixed to the bracket on the cultivator frame. The assembly of the bulldozer is over, you can try to row the snow.
Rotary snow plow
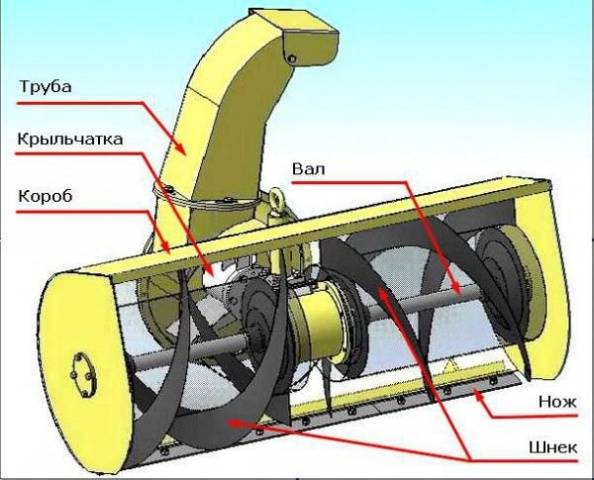
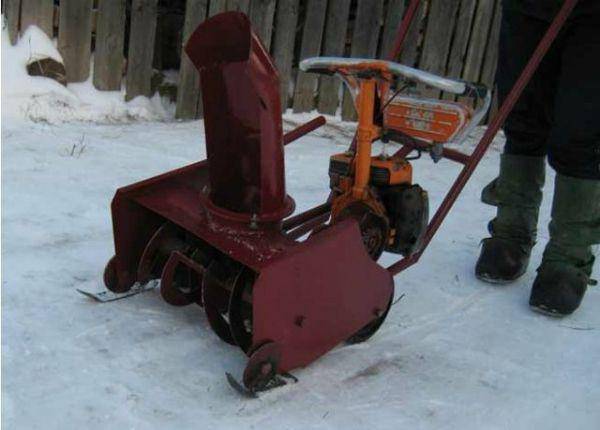
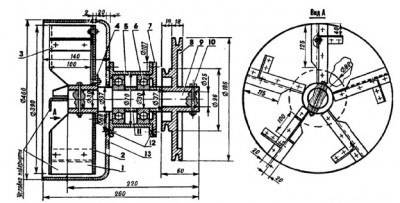
To make a rotary snow blower from a cultivator, you need to do a lot of turning and welding work. Such a hinge is also called auger. The mechanism consists of a steel case. Inside, the auger rotates on bearings. The spiral-shaped knives grab the snow and push it from the sides of the body towards the central part. At this point on the rotor, the metal blades rotate. They pick up the snow and push it out through a nozzle mounted on the snow blower body. The direction of departure is regulated by a visor. For this, a sleeve is put on the outlet of the nozzle. A pivoting visor is attached on top. The operator himself turns it in the right direction.
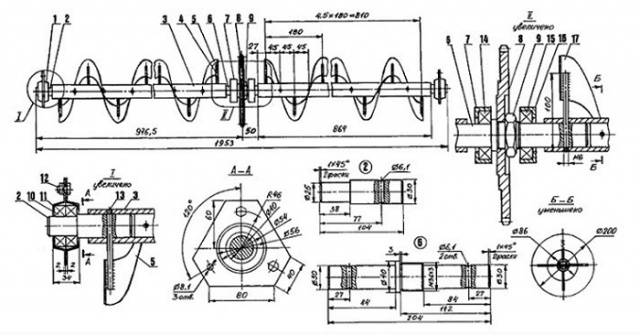
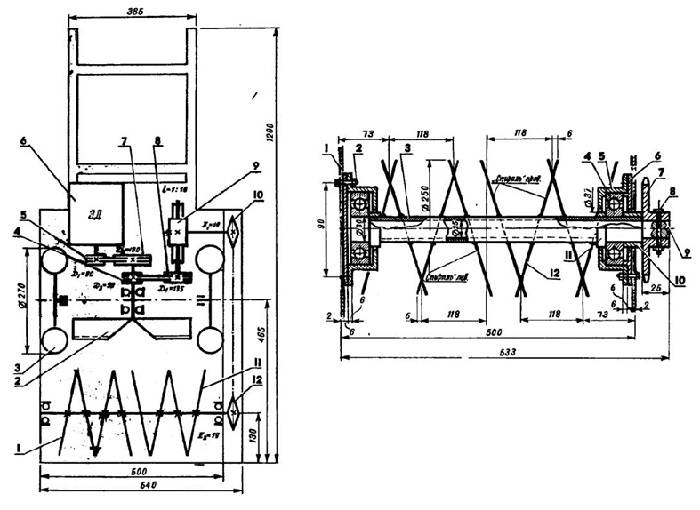
The most difficult part to manufacture is the auger. It is easier to find it ready-made from old agricultural equipment.Otherwise, you will have to do turning and welding. The auger is assembled according to the shown drawing. First, take a piece of pipe with a diameter of 20-25 mm. Pins are attached to both ends. The knives are made from 2 mm thick sheet steel. To do this, cut out 8 halves of the discs. They are welded to the pipe so that a double-sided spiral is obtained. Metal blades are welded in the center of the rotor between the two spirals.
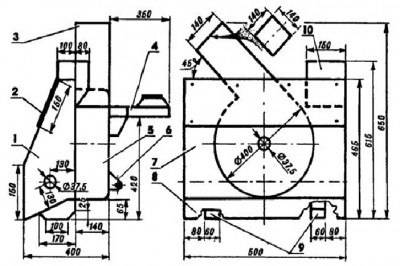
After the auger is made, the assembly of the snow blower body is started. Its fragments are cut out of steel sheet 2 mm thick. A steel strip is attached to the lower part of the body, which acts as a fixed knife. He will cut the layers of snow. To make the snow blower easier to move on the snow, the body is placed on runners called skis. A branch pipe from a piece of pipe is welded on top in the center of the body. This will be the snow outlet.
Further steps are aimed at installing the auger. First, the bearing seats No. 203 are bolted to the side walls of the housing from the inside. After that, the auger itself is installed. The transmission of torque from the cultivator motor to the rotor is organized using a belt drive. Here you need to install the drive and driven pulley. It is advisable to think over the tensioning system. It will help you adjust the gear to avoid slipping the belts.
The casing with a pivoting snow cover is bent out of galvanized steel. At the back, rods are attached to the body of the rotary snow blower, with the help of which the coupling with the cultivator is provided. During the operation of the mechanism, snow from the sleeve will fly out at a distance of 3–5 m. The throwing distance depends on the auger speed and the angle of inclination of the rotary canopy.
The video presents homemade rotary snow blower:
Fan snow blower for motor cultivator
According to the drawings presented, you can make a fan-type snow blower. First, an oval body is welded from sheet steel. This shape is needed for the suction of the snow by the fan. A bearing sleeve is installed in the hole in the rear of the housing. There will be 4 of them in the snow blower. Two bearings are pushed onto the shaft and then inserted into the bushing. One end of the shaft should protrude outside the housing. Two more bearings with a glass are placed here, to which the mounting brackets are welded. The end of the shaft should also protrude from this side.
The rotating snow blower mechanism is now complete. Now the fan blades are mounted on the shaft protruding inside the housing. In front, the impeller is covered with a protective steel mesh. A pulley is placed on the outer end of the protruding shaft. A belt drive from the working shaft of the motor cultivator motor will fit here.
Now you need to organize the hole for the snow discharge. For this, a wide hole is cut at the top of the oval housing near the fan impeller. A branch pipe is welded here, and a tin sleeve with a visor is put on top. The rotating blades of the fan will draw snow into the casing and, under pressure, throw it out through the sleeve.
The disadvantage of the blower snow blower is the limited use of the hitch. The fan is capable of sucking in only fresh loose snow. If the cover is caked, icy or wet, then such a snow blower will not work.
Combined cultivator snow blower
Craftsmen who love to invent something special have combined a rotary and fan snow blower into one design. The result is an effective attachment. In such a snow blower, the auger mechanism cuts off the packed and wet cover. The blades throw snow into the nozzle, where a working fan pushes it out with air through the sleeve. The effectiveness of using a combination snow blower is to increase the throw distance.
In the manufacture of this attachment, a rotary snow blower is first assembled. The outlet nozzle on the body is welded with a large diameter. Additionally, a ring is fixed on the side, into which a rotor with fan blades is inserted. A sleeve with a pivoting visor is put on top of the nozzle. The rotation of the fan and the auger is organized from the cultivator motor through a belt drive. You may need to put three-strand pulleys on the shafts.
Conclusion
The cost of a homemade snow blower will cost the owner many times less than purchasing a factory-made hinge.


