Content
At home, rabbits are fed food in bowls, jars and other similar containers. But a mobile animal often loves to play pranks, which is why grain from an inverted feeder ends up on the floor, and immediately wakes up through the cracks. Bunker feeders for rabbits installed in the cage help to reduce feed consumption, as well as to simplify the feeding process.
Why is it profitable to put bunker feeders for rabbits
To answer this question, put a bowl of grain and observe the habits of the eared pet. While the rabbit is hungry, he will calmly chew the food served to him. After satisfying hunger, the animal walks in the cage. Naturally, the bowl with the rest of the grain will be turned over. The rabbit can get angry, hit the floor with its hind legs, grab the feeder with its teeth and throw it around the cage. You can also watch the rabbits scoop food with their front paws. And it doesn't matter what it will be - grass or grain. Here, in order to rationally use feed, bunker feeders for rabbits are needed.

Another important point is feed contamination. Even if the rabbit does not turn the grain out of the bowl, he will surely stain it with droppings. Over time, the food will be eaten, but the risk of illness of the animal increases. Bloating and indigestion are especially common. By installing a bunker feeder for rabbits in the cage, the animal will always receive clean feed on time.
The hopper design of the feeder allows you to store feed for several days. The owner may not worry if he did not arrive at the dacha on time. The animal will be fed.
Self-made galvanized bunker feeder
It should be noted right away that it is better to make do-it-yourself feeders for rabbits from metal. A galvanized sheet with a thickness of 0.5 mm is perfect. Sometimes novice rabbit breeders practice making wood feeders, believing that it is easier this way. Indeed, the tree is easier to process, but rabbits love to gnaw it. So galvanized sheet metal is the best material for hopper feeders.
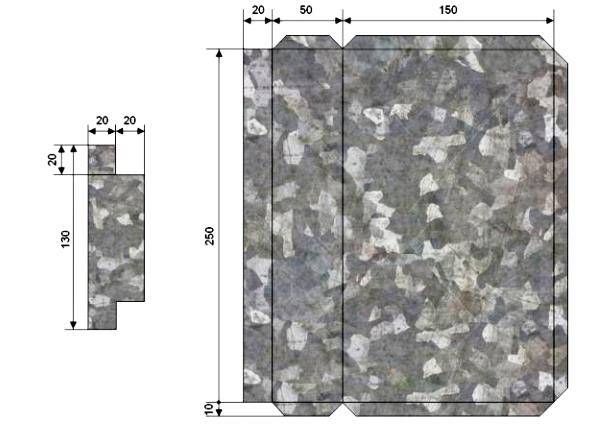
For the manufacture of the structure, you will need to draw up drawings. We have shown an example of a circuit in the photo. All fragments are placed on a galvanized sheet, after which they are cut out with scissors for metal.
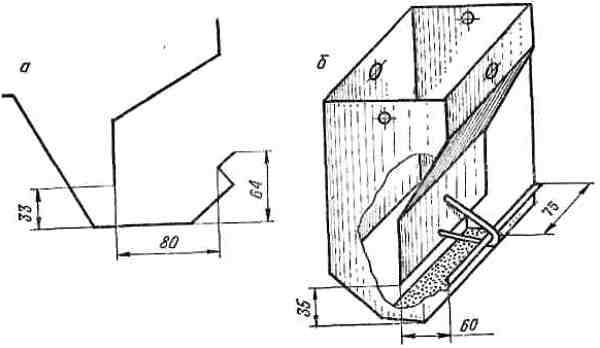
It is important to provide a top cover for the feeder so that no debris gets into the feed. You also need to think about fasteners, because the structure will have to be fixed to the cage wall. The feed from the hopper will be emptied into a tray that resembles a small trough. For its cutting, we suggest looking at the drawings. On the right in the photo is the pattern of the tray, and on the left is the feed limiter.
The diagram shown is designed with optimal dimensions for standard cages. If you need a large-sized feeder, then all the fragments can be proportionally increased at your discretion.
So, there is a drawing of the bunker feeder, you can start making it:
- The feeder consists of three main parts: a tray, a back wall and a front wall. The limiter is an optional fourth part, but it is also advisable to make it so that the rabbits take less feed. Making a tin feeder begins with a tray.To do this, the fragment cut from the galvanized sheet is folded along the lined fold lines. It is important to leave 1 cm of allowance at the joints. They are needed to connect the structure.
- To reduce the number of joints, the sides and back wall are made from a single piece of galvanized steel, 37 cm long. It is bent in width, dividing it into three parts. As a result, you get two side shelves 15 cm wide, and a back wall 25 cm wide.
- The front wall is also made from one workpiece 27 cm long. On a galvanized fragment, 3 bends in width are obtained. The dimensions of each shelf are in order: 13.14 and 10 cm.
- Now it remains to put all the parts together. If everything fits, holes are drilled at the joints where the allowances were left. The connection is made with rivets or bolts.
- To close the made feeder, a rectangle 15x25 cm in size is cut out of the galvanized hinged lid. The workpiece is attached to the hopper with hinges.
As you can see, it is not difficult to make a galvanized bunker feeder. It is only important that its minimum capacity is calculated for the daily feed rate.
The video shows a metal feeder:
Making a feeder from a galvanized profile
An accurate and fast bunker feeder for rabbits will be made of a profile with a section of 100x40 mm. The photo shows a drawing with dimensions. All these fragments need to be transferred to the blanks.
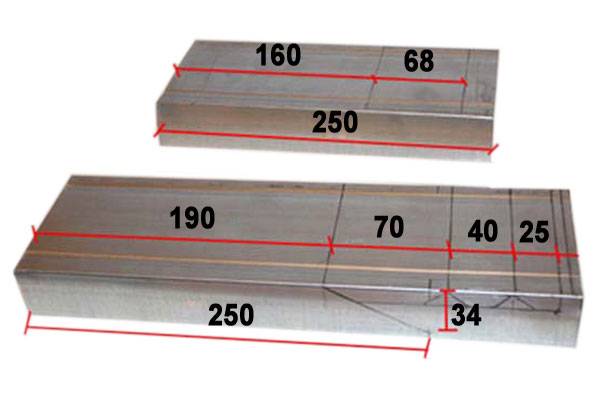
The following photo will help you understand the order of work, as well as correctly determine the places of the cut and fold.
Let's look at the order of how to make a feeder from a profile:
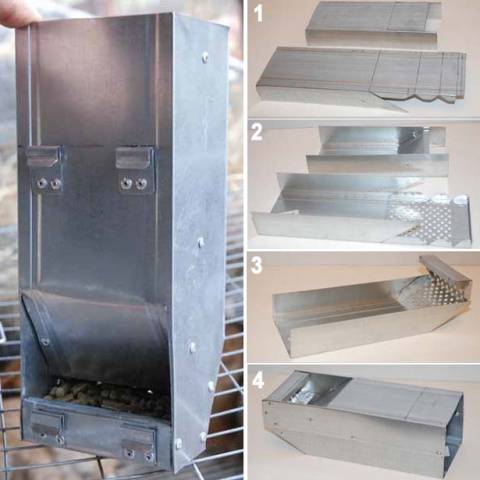
- After marking the profile, according to the presented scheme, cuts are made with metal scissors and excess areas are removed.
- The lower part of the workpiece, as shown in the photo, is perforated with an electric drill. There will be food available for the eared pet.
- Along the fold lines, the shape of the feeder is given to the workpiece. Holes are drilled at the joints, after which they are riveted. On the back side, two hooks from galvanized pieces are attached. They are needed to hang the structure on the cage wall.
In the video, a steel profile feeder:
This type of bunker feeder is designed for one rabbit. In a large cage, you will have to install several such structures.
Making a bunker-type feeder from other materials
So, a reliable bunker feeder for rabbits with their own hands is made of galvanized steel. And what else can you make the simplest design for the first time?
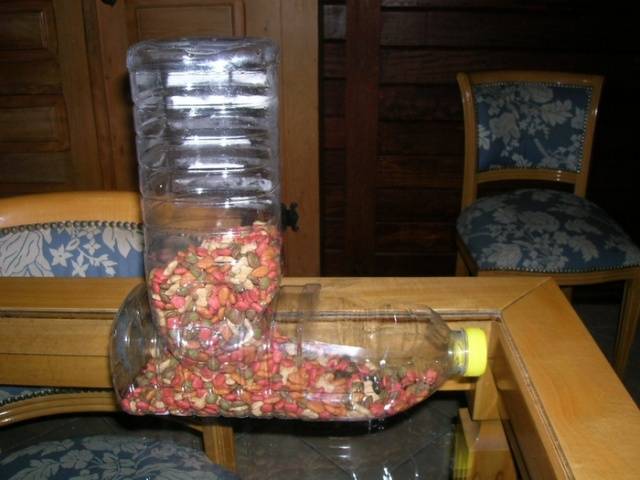
Let's take two regular PET juice bottles with a wide mouth. For their base, a frame must be made of boards or plywood 10 cm wide. Two strips are held together at an angle of 90aboutto make the letter "G". One of the bottles is screwed to the bottom shelf with self-tapping screws, after having cut out its side part. The second bottle is fixed to the vertical shelf with clamps so that its neck goes into the cut window of the lower container, but does not reach 1 cm to the wall. In a vertical container, the bottom is cut off to a large part of the circumference to form a folding lid.
This completes the bunker structure. The plywood frame is attached to the cage wall, and dry food is poured into the vertical bottle. As the rabbit eats it, the grain will pour through the mouth of the hopper into a horizontally fixed bottle.
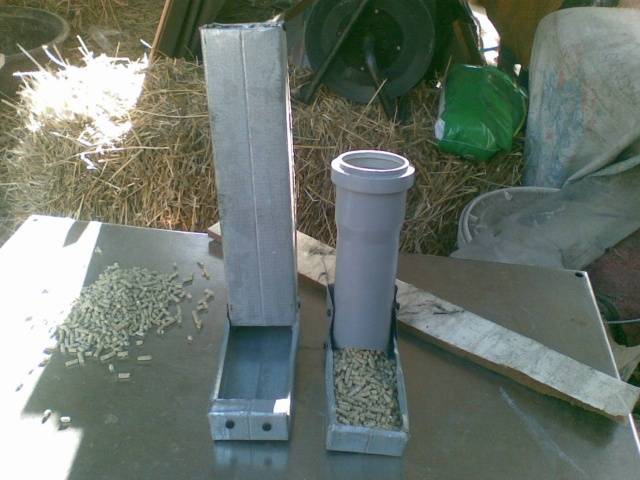
A similar structure can be made from a pipe, as shown in the photo. A piece of galvanized profile is used as a tray. For the bunker, a piece of about 50 cm of PVC sewer pipe is cut off, a recess is cut from the bottom for spilling feed, and then it is fastened to the tray with self-tapping screws.
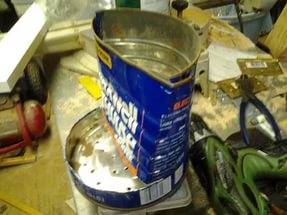
The next option is presented from a tin can. It needs to be cut in half, leaving about 5 cm of the side near the bottom. The side cut from the bottom is completely separated from the can. To do this, you need to make two cuts from top to bottom. From the obtained piece, the front wall of the hopper is bent and fixed with rivets. The result is a structure as in the photo.
There are a lot of options for ideas for rabbit feeders. The main thing is to carefully remove metal burrs so that the animal does not get hurt.


